Dialogue
Dialogue
Note
Colons and semicolons in each dialogue should be English characters!
The way to write character dialogue is very simple, and it is almost the same as natural language.
Info
When the font is medium and large, the text box displays 2 lines, and when the font is small, it displays 3 lines.
Basic Character Dialogue
First, open start.txt in the scene folder of the game resource directory using Notepad or a text editor such as VS Code or sublime, and then you can start writing your first dialogue.
The way to write character dialogue is very simple, you just need to enter Character: dialogue;
Example:
Yukino Yukinoshita: Please have some tea;
Yui Yuigahama: Ah, thank you;
Komachi: Thank you, Sister Yukino!;
Iroha Isshiki: Thank you, senior. ;
After each dialogue/script, use a semicolon as the end. (Sometimes it works if you don't write a semicolon, but the author still recommends adding a semicolon to prevent bugs).
Continuous Dialogue
If your multiple dialogues do not change the character name, you can use continuous dialogue, and you can omit the character name, and use it when you need it:
Yukino Yukinoshita: You're here early;
; // At this time, the character name of the dialogue is still "Yukino Yukinoshita"
Sorry, have you been waiting long?;
Hachiman Hikigaya: Just arrived;
Narration
If you want to create a monologue dialogue without a character name, leave a blank space before the colon (but do not omit the colon):
:This is a monologue;
Blackout Text
In many games, some text is displayed on a black screen, which is used to introduce the theme or express the character's mental activities. You can use the intro command to perform a monologue:
intro: Memories don't need a suitable script, | Anyway, once you say it, | It all becomes a joke. ;
The monologue is split by the separator (|), that is, each | represents a line break. In the actual performance, the above text will become:
Memories don't need a suitable script,
Anyway, once you say it,
It all becomes a joke.
If you want to keep the monologue UI after the monologue ends instead of continuing the game flow, use the -hold parameter.
intro:Recalling doesn't need a suitable script,|anyway, once it's spoken,|it all becomes a joke. -hold;
Get User Input
Use the getUserInput instruction to get user input and write it into a variable, for example:
getUserInput:name -title=What is your name -buttonText=OK; Write user input to variable name
Among them, the title parameter is the text of the prompt, and buttonText is the text of the confirmation button
Variable Interpolation
You can use the {} syntax in a statement to perform variable interpolation and pass a variable into the statement, for example:
WebGAL: Nice to meet you, {name}!
Variable interpolation also applies to character names, for example:
{name}: I like WebGAL the most too!;
Ruby
Adding ruby to dialogue text is a very common performance effect in Japanese games. Because there are often some words in Japanese that are inconsistent in writing and pronunciation.
The grammar of Ruby is [Word to be annotated](annotation)
Example:
『[笑顔](えがお)』なんて、『[笑う](わらう)』なんて、[誰](だれ)でも[出来](でき)るもん…!
Text Enhancement Syntax
In WebGAL 4.5.3, the "text enhancement syntax" feature has been added. This syntax allows you to add text styles to specific text.
Text enhancement syntax is an enhancement to a specific piece of text. Text enclosed in [] and followed by () as a text enhancement description is text that conforms to the text enhancement syntax definition.
In simple terms, it takes the following form:
WebGAL:[Text](style-alltext=font-style:italic\;font-size:80%\; style=color:#66327C\; ruby=wen ben)
This means that the font size of this text is smaller, italicized, the color is #66327C, and it has ruby annotation.
For different parameters in the text enhancement syntax, use spaces to separate them, and the form is always argk=argv.
It is important to note that because ; is the comment syntax of WebGAL, you need to add \ to escape it in the text enhancement syntax, which becomes ;.
Scope of Style Effects for Different Parameters
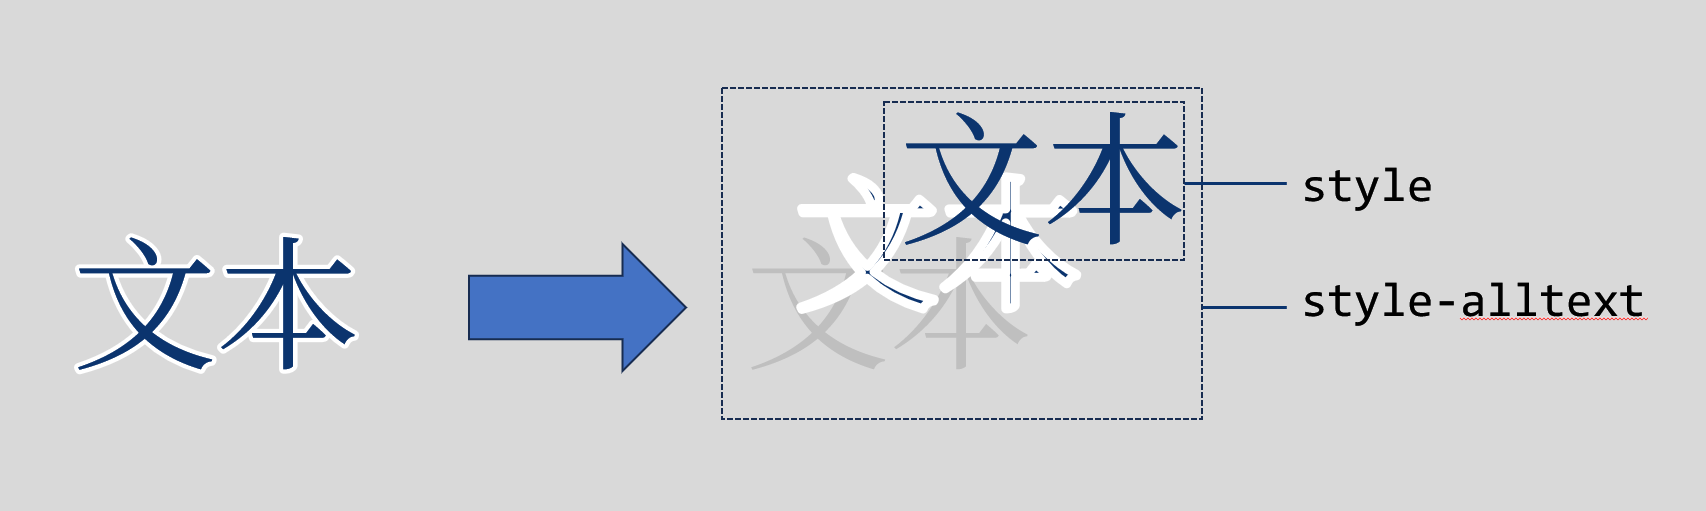
In the previous example syntax, notice that there are two different parameters that can define styles for text: style and style-alltext.
The reason for distinguishing the scope of text styles is that in order to provide a better stroke effect for text, WebGAL divides a character into three layers: text, stroke, and placeholder.
Text is the topmost part and the main part. The stroke is below the text and is covered by the text to provide a white stroke without destroying the internal shape of the text. The bottom layer is a transparent placeholder that provides positioning.
In short, if you only need to change the text color, you only need to use the style parameter. If you want to apply effects such as italics, text size, internal and external margins, you need to set the effects for style-alltext at the same time.
Special note: Due to a bug in version 4.5.3, it is currently not possible to apply only the style-alltext parameter, because the text enhancement syntax is only activated when the syntax style= is detected.
Compatibility with Phonetic Annotations
For compatibility with the previous syntax, if the syntax style= is not recognized, then we will treat the ()[] syntax as a phonetic annotation.
If the new text enhancement syntax is used, the phonetic annotation is written in the ruby= parameter, as illustrated in the example above.
Close the Text Box
Sometimes, for some special performance effects, you may want to temporarily close the text box, so you can use the following instructions to close the text box:
setTextbox:hide; // Close the text box
When the value of the setTextbox instruction is hide, the text box will be closed and the user will not be able to open it in any way. If you want to display the text box again, call this command again and enter any value other than hide.
setTextbox:on; // Can be any value other than hide.
End the Game and Return to Title
If you want to end the game and return to the title after the plot, please use:
end;
In this way, the game can return to the title interface.
Cinematic Mode (Test Feature)
Use filmMode:enable; to enable cinematic mode.
Use filmMode:none; to disable cinematic mode.